2022. 8. 23. 03:48ㆍ유니티 unity
https://docs.unity3d.com/kr/2022.1/Manual/JobSystemOverview.html
Job시스템에 대해서 알아보자면
Unity C# 잡 시스템을 통해 사용자는 나머지 Unity 기능과 잘 연동하고 수정 코드 작성을 용이하게 해주는 멀티스레드 코드를 작성할 수 있습니다.
멀티스레드 코드를 작성하면 성능이 향상되는 이점을 누릴 수 있으며, 프레임 속도도 대폭 개선됩니다. 버스트 컴파일러를 C# 잡과 함께 사용하면 코드 생성 품질이 개선되며, 모바일 디바이스의 배터리 소모량도 크게 감소합니다.
C# 잡 시스템의 핵심은 Unity의 내부 기능(Unity의 네이티브 잡 시스템)과 통합된다는 점입니다. 사용자가 작성한 코드와 Unity는 동일한 워커 스레드를 공유합니다. 이러한 협력을 이용하면 CPU 코어보다 많은 스레드를 만들지 않아도 되므로 CPU 리소스에 대한 경쟁을 피할 수 있습니다.
멀티스레드코드를 작성할 때 항상 경쟁 상태가 발생할 위험이 있기 때문에 그것을 좀 더 안전하게 데이터들을 접근할 수 있도록 도와주는 게 Job시스템입니다.
멀티스레드에서 경쟁상태(Race Condition)란 공유 자원에 여러 프로세스 / 스레드가 동시에 접근할 때, 결과값에 영행을 줄 수 있는 상태입니다.
유니티 엔진은 단일 스레드를 사용하기 때문에 메인 스레드 이외의 스레드에서 유니티 메인시스템(오브젝트를 이동시킨다거나)에 접근하면 에러가 발생합니다.
잡을 이용한다고해도 메인 스레드가 아닌 이외의 스레드가 메인시스템에 접근해도 오류가 발생합니다.
멀티스레드를 활용할 수 있는 곳이라면 멀티스레드를 사용해서 성능 향상을 좀 더 올리는 게 현명하다고 생각합니다.
많은 수 의 연산이라던가 Astar같은 길 찾기 연산 등등 멀티 스레드를 사용해도 괜찮은 것들은 멀티스레드를 사용해서 성능을 올리는 게 좋을 거 같습니다.
잡 시스템을 쉽게 요약하자면 멀티쓰레드를 사용을 해야 할 때 유니티에서 제공하는 멀티스레드 안전장치를 사용할 수 있고
유니티가 직접 관리 하는 스레드 이기 때문에 콘솔로 디버깅이 가합니다.
단점으로는 메인스레드에서 관리하는 데이터에 접근할 수 없음(오브젝트 이동하기 등등),워커 스레드를 사용하기 때문에
일반 스레드처럼 sleep을 사용할 수 없음.
job을 사용하는법에 대해서 알아보자면
공유 메모리 타입인 NativeContainer를 이용해서 데이터를 사용합니다
NativeContainer의 타입은 4가지가 있는데
- NativeList - 크기 변경이 가능한 NativeArray입니다.
- NativeHashMap - 키 및 값 쌍입니다.
- NativeMultiHashMap - 키당 여러 개의 값입니다.
- NativeQueue - 선입선출(FIFO) 대기열입니다.
기본적으로 읽기와 쓰기 모두를 사용이 가능한데. 쓰기가 필요 없다면 [ReadOnly]를 넣어서 좀 더 성능을 향상할 수 있습니다.
[ReadOnly]
public NativeArray<int> input;
NativeContainer를 만들 때는 필요한 메모리 할당 타입을 지정해야하는데, 할당 타입은 잡 실행 시간에 따라 다르기 때문에
할당을 맞춤 설정하여 각 상황에서 최고의 성능을 끌어낼 수 있습니다.
- Allocator.Temp는 할당 속도가 가장 빠릅니다. 한 프레임 이하의 수명을 가진 할당에 사용합니다. 하지만 NativeContainer 할당을 잡에 전달하기 위해 Temp를 사용할 수는 없습니다.
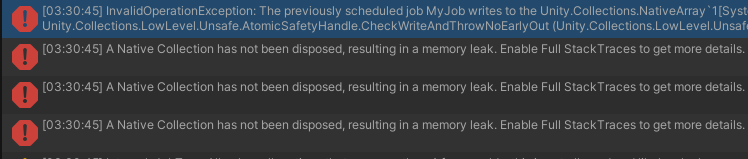
- Allocator.TempJob은 Temp 보다 할당 속도가 더 느리지만 Persistent 보다는 속도가 더 빠릅니다. 4프레임 내의 스레드 세이프 할당에 사용합니다. 중요: 이러한 타입의 할당은 반드시 4프레임 내에서 Dispose 메서드를 호출해야 합니다. 그렇지 않으면 콘솔은 네이티브 코드에서 생성된 경고를 출력합니다. 대부분의 소규모 잡은 이러한 NativeContainer 할당 타입을 사용합니다.
- Allocator.Persistent는 가장 느린 할당이지만, 애플리케이션의 주기에 걸쳐 필요한 만큼 오래 지속됩니다. malloc에 대한 직접 호출을 위한 래퍼입니다. 오래 걸리는 잡은 이 NativeContainer 할당 타입을 사용할 수 있습니다. 성능이 중요한 상황에서는 Persistent를 사용하면 안 됩니다.
NativeArray<float> result = new NativeArray<float>(1, Allocator.TempJob);예제 왼쪽의 숫자는 NativeArray의 크기를 나타납니다.
job을 사용 할려면 IJob이라는 인터페이스를 구현해야 합니다.
public struct MyJob : IJob
{
    public float a;
    public float b;
    public NativeArray<float> result;

    public void Execute()
    {
        result[0] = a + b;
    }
}
사용
void Start()
{
    // 결과를 저장할 배열을 만듭니다.
    NativeArray<float> result = new NativeArray<float>(1, Allocator.TempJob);


    // job 데이터를 설정합니다.
    MyJob jobData = new MyJob();
    jobData.a = 10;
    jobData.b = 10;
    jobData.result = result;


    // job을 예약합니다
    JobHandle handle = jobData.Schedule();


    // job이 끝나기를 대기합니다.
    handle.Complete();


    // 결과를 가져옵니다.
    float aPlusB = result[0];


    // 메모리 해제
    result.Dispose();
}
여기서 Schedule() , 예약을 하고 완료 전까지
NativeContainer 타입을 수정하면 오류가 발생합니다
예시
public struct MyJob : IJob
{
    [ReadOnly]
    public NativeArray<float> a;
    [ReadOnly]
    public NativeArray<float> b;

    public NativeArray<float> result;

    public void Execute()
    {
        result[0] = a[0] + b[0];
    }
}
void Start()
{
// 결과를 저장할 배열을 만듭니다.
NativeArray<float> a = new NativeArray<float>(1, Allocator.TempJob);
NativeArray<float> b = new NativeArray<float>(1, Allocator.TempJob);
NativeArray<float> result = new NativeArray<float>(1, Allocator.TempJob);
a[0] = 10;
b[0] = 10;
// job 데이터를 설정합니다.
MyJob jobData = new MyJob();
jobData.a = a;
jobData.b = b;
jobData.result = result;
// job을 예약합니다
JobHandle handle = jobData.Schedule();
jobData.a[0] = 99; // 오류
// job이 끝나기를 대기합니다.
handle.Complete();
// 결과를 가져옵니다.
float aPlusB = result[0];
// 메모리 해제
a.Dispose();
b.Dispose();
result.Dispose();
}
확인을 위해서 a와 b의 변수를 바꾸고
job을 예약한(Schedule()) 뒤 a변수를 수정하고 실행해보면
오류가 발생합니다.
JobHandle handle = jobData.Schedule();


// job이 끝나기를 대기합니다.
handle.Complete();

jobData.a[0] = 99; // 이건 가능
ParallelFor를 사용하면 잡을 하나가 아닌 여러 개의 잡을 실행 할 수 있습니다.
public struct MyParallelJob : IJobParallelFor
{
    [ReadOnly]
    public NativeArray<float> a;
    [ReadOnly]
    public NativeArray<float> b;
    public NativeArray<float> result;

    public void Execute(int i)
    {
        result[i] = a[i] + b[i];
    }
}
NativeArray<float> a = new NativeArray<float>(2, Allocator.TempJob);

NativeArray<float> b = new NativeArray<float>(2, Allocator.TempJob);

NativeArray<float> result = new NativeArray<float>(2, Allocator.TempJob);

a[0] = 1.1;
b[0] = 2.2;
a[1] = 3.3;
b[1] = 4.4;

MyParallelJob jobData = new MyParallelJob();
jobData.a = a;
jobData.b = b;
jobData.result = result;

JobHandle handle = jobData.Schedule(result.Length, 2);


//잡이 완료 할 때 까지 기다립니다.
handle.Complete();

// 메모리 해제
a.Dispose();
b.Dispose();
result.Dispose();
잡 시스템을 사용을 해보겠습니다.
간단한 반복 연산 스크립트를 작성합니다.
using Unity.Burst;
using Unity.Collections;
using Unity.Jobs;
using UnityEngine;

[BurstCompile]
public struct MyJob2 : IJobParallelFor
{
    public NativeArray<float> resultArray;

    public float deltaTime;

    void IJobParallelFor.Execute(int index)
    {
        resultArray[index] += Mathf.Exp(Mathf.Sqrt(deltaTime));
    }


}
public class jobtest : MonoBehaviour
{
    public bool isJob; //잡 사용 확인

    public float[] test1=new float[500000]; //배열


    void Update()
    {
        if (isJob)
        {
            NativeArray<float> result = new NativeArray<float>(test1,Allocator.TempJob);


            MyJob2 job = new MyJob2
            {
                resultArray = result,
                deltaTime = Time.deltaTime,

            };
            JobHandle jobHandle = job.Schedule(result.Length, 100);
            //실행

            jobHandle.Complete();
            //완료까지 대기

            result.CopyTo(test1);
            //result 의 변수의 값들을 test1로 복사시킴

            result.Dispose();
            //메모리 해제


        }
        else
        {
            for (int i = 0; i < test1.Length; i++)
            {
                test1[i] = Mathf.Exp(Mathf.Sqrt(Time.deltaTime));
            }
        }

    }
}
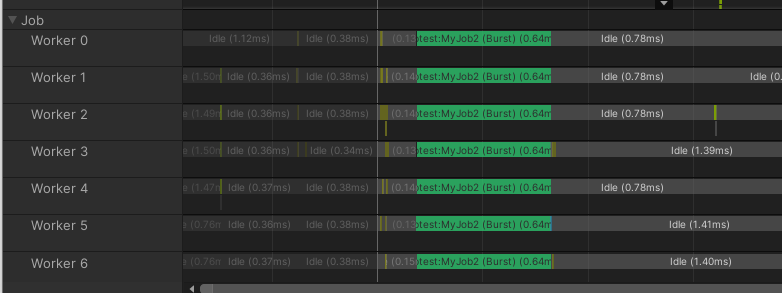
BurstCompile 하고 같이 사용하면 프레임이 대폭 상승하는 게 보입니다.
버스트란
버스트는 첨단 컴파일러 기술로서, 새로운 데이터 지향 기술 스택(DOTS)과 Unity 잡 시스템으로 만든 Unity 프로젝트의 성능을 가속화합니다. 버스트는 고성능 C#(HPC#)이라고 불리는 C# 언어의 하위 집합을 컴파일하고 LLVM 컴파일러 프레임워크를 바탕으로 하는 고급 최적화를 사용하여 기기의 성능을 효율적으로 활용합니다.
BurstCompile
https://blog.unity.com/kr/technology/enhancing-mobile-performance-with-the-burst-compiler
버스트 컴파일러로 모바일 성능 강화 | Unity Blog
버스트는 첨단 컴파일러 기술로서, 새로운 데이터 지향 기술 스택(DOTS)과 Unity 잡 시스템으로 만든 Unity 프로젝트의 성능을 가속화합니다. 버스트는 고성능 C#(HPC#)이라고 불리는 C# 언어의 하위 집
blog.unity.com
https://docs.unity3d.com/Packages/com.unity.burst@1.8/manual/getting-started.html
Getting started | Burst | 1.8.0-pre.2
Getting started Burst is primarily designed to work with Unity's job system. To start using the Burst compiler in your code, decorate a Job struct with the [BurstCompile] attribute. Add the [BurstCompile] attribute to the type and the static method you wan
docs.unity3d.com
물론 실제 프로젝트에서 저런식으로 하지는 않겠지만 확실하게 job을 사용하면 성능 향상을 볼 수 있습니다.
멀티스레드에서 메인스레드가 아닌 스레드에서 메인데이터를 접근을 할 수 없지만
IJobParallelForTransform를 이용하면 메인 스레드의 데이터인 트랜스폼에 대해서 접근할 수 있습니다.
아직도 job이 계속 발전되고 있는 상황이라 아직은 하나밖에 없습니다.
이번엔 베지어곡선을 이용해서 오브젝트를 이동하면서 연산을 해보겠습니다.
IJobParallelForTransform에 대해서 잠깐 보자면
TransformAccess 단일
TransformAccessArray 배열
이 변수를 활용하면 멀티스레드에서 트랜스폼을 이동이 가능할 수 있습니다.
public void Execute(int index, Jobs.TransformAccess transform);
using System.Collections.Generic;
using Unity.Burst;
using Unity.Collections;
using Unity.Jobs;
using Unity.Mathematics;
using UnityEngine;
using UnityEngine.Jobs;
using Random = UnityEngine.Random;

[BurstCompile]
public struct MyJob : IJobParallelForTransform
{
    [ReadOnly] public NativeArray<Vector3> P0;
    [ReadOnly] public NativeArray<Vector3> P1;
    [ReadOnly] public NativeArray<Vector3> P2;
    [ReadOnly] public NativeArray<Vector3> P3;
    [ReadOnly] public NativeArray<float> t;
     public NativeArray<float> value;
    public float dealtaTime;

    public void Execute(int index, TransformAccess transform)
    {
        Vector3 a;
        a.x = Bezier(P0[index].x, P1[index].x, P2[index].x, P3[index].x, t[index]);
        a.y = Bezier(P0[index].y, P1[index].y, P2[index].y, P3[index].y, t[index]);
        a.z = Bezier(P0[index].z, P1[index].z, P2[index].z, P3[index].z, t[index]);
        transform.position = a;
        for (int i = 0; i < 5000; i++)
        {
            value[index] += Mathf.Sin(dealtaTime);
        }
    }

    float Bezier(float P0, float P1, float P2, float P3,float t)
    {
    //베지어함수
        return Mathf.Pow((1 - t), 3) * P0 + Mathf.Pow((1 - t), 2) * 3 * t * P1 + Mathf.Pow(t, 2) * 3 * (1 - t) * P2 +
               Mathf.Pow(t, 3) * P3;
    }
}

public class job : MonoBehaviour
{
    public GameObject cubePrefab;
    public List<CubeStat> cubes;

    private float Speed = 5f;
    private float[] valueArray;

    public bool IsJob;

    private void Start()
    {
        for (int i = 0; i < 2000; i++)
        {
            GameObject cube = Instantiate(cubePrefab, new Vector3(Random.Range(-20f, 20f), 0, Random.Range(-10f, 10f)),
                quaternion.identity);
            if (cube.transform.TryGetComponent(out CubeStat stat))
            {
                stat.P0 = cube.transform.position;
                stat.P1 = stat.P0 + new Vector3(0, 10, 0);
                stat.P3 = stat.P0 + new Vector3(0, 0, 100);
                stat.P2 = stat.P3 + new Vector3(0, 10, 0);
                cubes.Add(stat);

            }

        }

        valueArray = new float[cubes.Count];
    }


    // Update is called once per frame
    void Update()
    {
        if (IsJob == true)
        {
            NativeArray<Vector3> P0 = new NativeArray<Vector3>(cubes.Count, Allocator.TempJob);
            NativeArray<Vector3> P1 = new NativeArray<Vector3>(cubes.Count, Allocator.TempJob);
            NativeArray<Vector3> P2 = new NativeArray<Vector3>(cubes.Count, Allocator.TempJob);
            NativeArray<Vector3> P3 = new NativeArray<Vector3>(cubes.Count, Allocator.TempJob);
            NativeArray<float> value = new NativeArray<float>(cubes.Count, Allocator.TempJob);
            NativeArray<float> t = new NativeArray<float>(cubes.Count, Allocator.TempJob);

            TransformAccessArray transformAccessArray = new TransformAccessArray(cubes.Count);

            for (int i = 0; i < cubes.Count; i++)
            {
                 P0[i] = cubes[i].P0;
                 P1[i] = cubes[i].P1;
                 P2[i] = cubes[i].P2;
                 P3[i] = cubes[i].P3;
                 t[i] = Random.Range(0f, 1f);
                 //0~1 사이로 설정
                transformAccessArray.Add(cubes[i].transform);
            }

            MyJob job = new MyJob
            {
                P0 = P0,
                P1 = P1,
                P2 = P2,
                P3 = P3,
                t = t,
                value =value

            };
            JobHandle jobHandle = job.Schedule(transformAccessArray);
            jobHandle.Complete();

            value.CopyTo(valueArray);


            P0.Dispose();
            P1.Dispose();
            P2.Dispose();
            P3.Dispose();
            t.Dispose();
            value.Dispose();
            transformAccessArray.Dispose();
        }
        else
        {
        //잡을 사용안할 때


            for (int i = 0; i < cubes.Count; i++)
            {
                float t = Random.Range(0f, 1f);
                Vector3 a;
                a.x =Bezier(cubes[i].P0.x, cubes[i].P1.x, cubes[i].P2.x, cubes[i].P3.x, t);
                a.y =Bezier(cubes[i].P0.y, cubes[i].P1.y, cubes[i].P2.y, cubes[i].P3.y, t);
                a.z =Bezier(cubes[i].P0.z, cubes[i].P1.z, cubes[i].P2.z, cubes[i].P3.z, t);

                cubes[i].transform.position = a;
                for (int j = 0; j < 5000; j++)
                {
                    valueArray[i] += Mathf.Sin(Time.deltaTime);
                }

            }


        }
    }


    public float Bezier(float P0, float P1, float P2, float P3,float t)
    {
        return Mathf.Pow((1 - t), 3) * P0 + Mathf.Pow((1 - t), 2) * 3 * t * P1 + Mathf.Pow(t, 2) * 3 * (1 - t) * P2 +
               Mathf.Pow(t, 3) * P3;
    }
}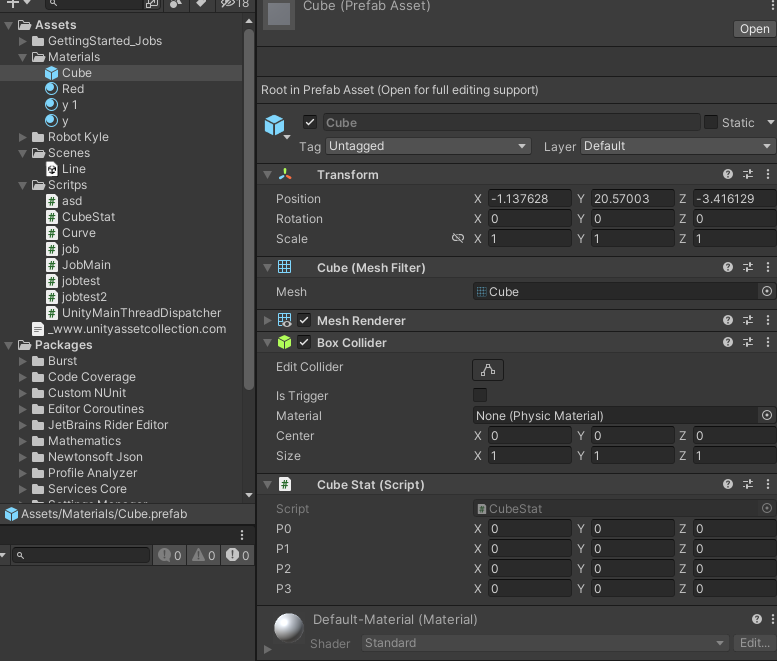
public class CubeStat : MonoBehaviour
{
    public Vector3 P0;
    public Vector3 P1;
    public Vector3 P2;
    public Vector3 P3;

}
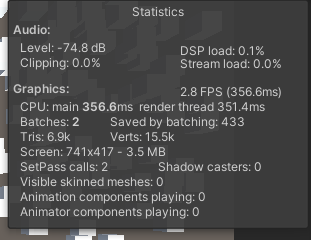
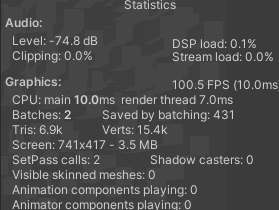
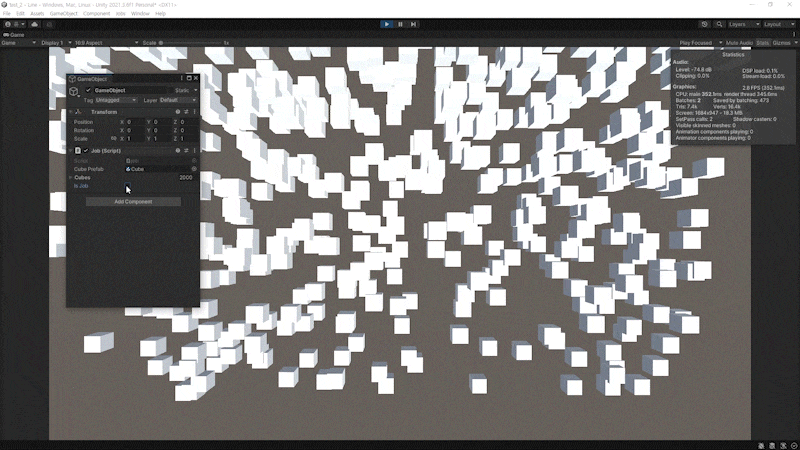
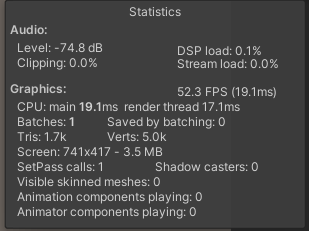
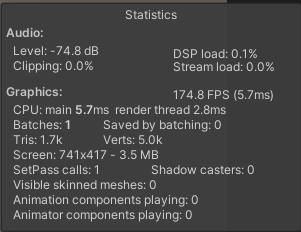
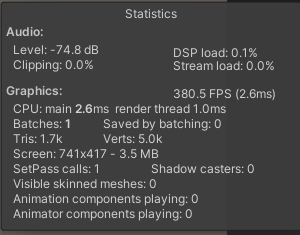
극단적으로 프레임 비교를 하기 위해서 만들었습니다.
하나의 스레드에서 사용한다는것보다 조금 덜어서 멀티 스레드를 활용한다면 확실한 성능 향상이 있을 거라고 생각합니다.
'유니티 unity' 카테고리의 다른 글
| [유니티] 문자열을 이용하여 클래스 인스턴스 생성하기 :상속 관계에서의 동적 클래스 생성 (0) | 2024.03.24 |
|---|---|
| 유니티(Unity) 오브젝트 풀링 (2) | 2022.09.13 |
| Unity / 베지어곡선이용해서 라인렌더로 곡선 그리기 (0) | 2022.08.16 |
| 유니티(Unity) Quaternion 전부 알기 (0) | 2022.08.15 |
| Unity Unitask 사용법 (0) | 2022.08.10 |